Ecommerce revenue and attribution tracking
Track which marketing campaigns and landing pages drive the most revenue by assigning monetary values to your custom events.
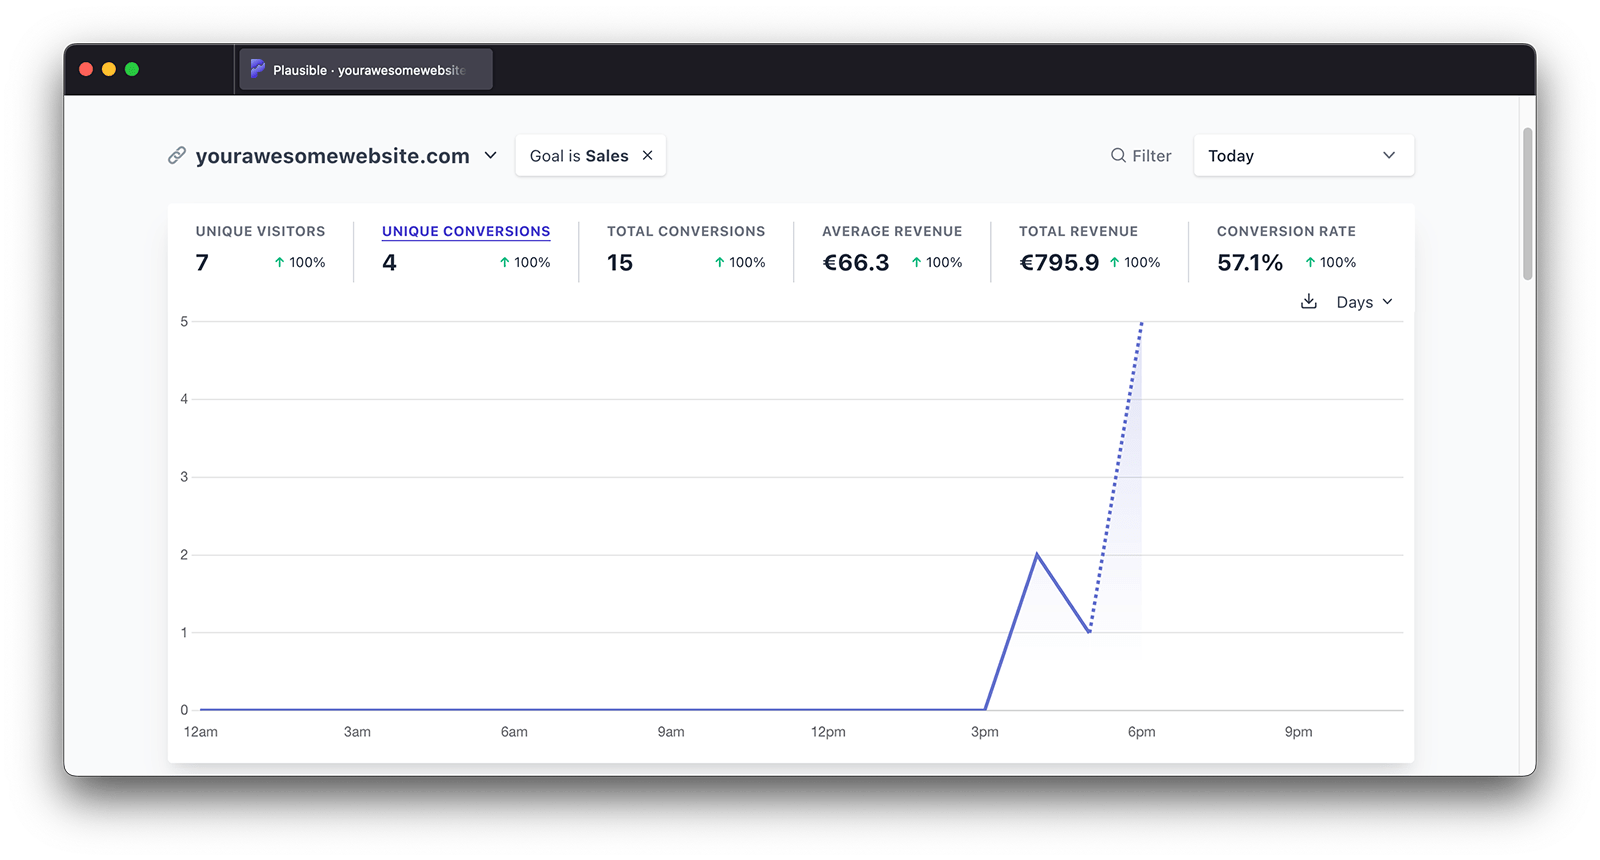
When you create a new custom event, you can optionally assign a monetary value to it. Our revenue tracking supports multi-currencies too. You can send data in any local currency that the purchase is made in. When using revenue tracking, you'll be able to see these metrics in your dashboard:
- Unique conversions
- Total conversions
- Conversion rate
- Total revenue
- Average revenue
Total revenue shows your overall performance. Average revenue helps you identify which sources or campaigns drive high-value customers rather than just high volume. A source sending fewer but higher-value orders can be worth more than a high-volume source with a low average order value.
The revenue metrics are fully filterable. For instance, you can see the total or average revenue for a particular custom event per any dimension such as a specific date, referral source, marketing campaign, entry page, country or device.
You can add multiple filters to create audience segments too. This allows you to see the conversions and revenue from for instance the audience segment that's located in Germany, Austria and Switzerland, that were referred by a particular UTM campaign and are using Mac OS.
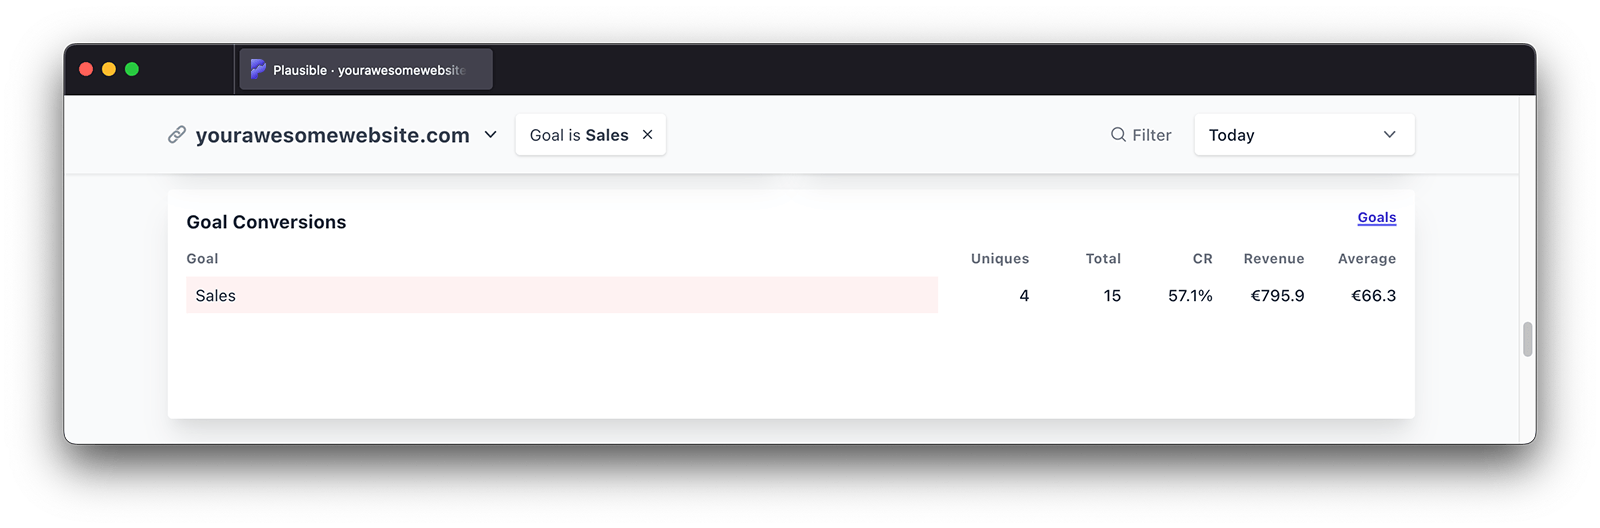
When the revenue goal filter is applied on the dashboard, you will also find the "Revenue" column appear in all the individual reports (when expanded using the expand icon in the top right). This is useful in seeing the breakdown of your revenue by individual traffic sources, entry or exit pages, locations, browser types and properties. You can also sort your reports by revenue in either ascending or descending order.
Clean referral source attribution
Plausible automatically excludes unwanted referral sources such as payment processors like PayPal, Stripe and Paddle to keep your data clean.
Referral sources are counted only when they start a new session on your site. This means that when visitors briefly leave your site to complete a payment on an external gateway before returning, the payment processor won't show up as a referral source. The original source that brought the visitor to your site will remain the one attributed for that conversion.
This ensures your revenue is attributed to the marketing campaigns, referral sources and landing pages that actually drove the sale rather than the payment gateway the visitor passed through along the way.
Before you start: what you need
Revenue tracking in Plausible is built on top of custom events. Before setting up revenue tracking, you need:
- The Plausible snippet installed on your site
- A conversion event to attach the revenue value to (typically a purchase confirmation, form submission or upgrade click)
- Access to the revenue amount at the point the event fires: from your checkout page, a thank you page or a server-side callback
If you are tracking revenue on an order confirmation page, the revenue amount needs to be available in the page's JavaScript at the time the event fires. Most ecommerce platforms expose this via a data layer or template variable.
How to track ecommerce revenue
If you want to track ecommerce revenue, here's how to enable it:
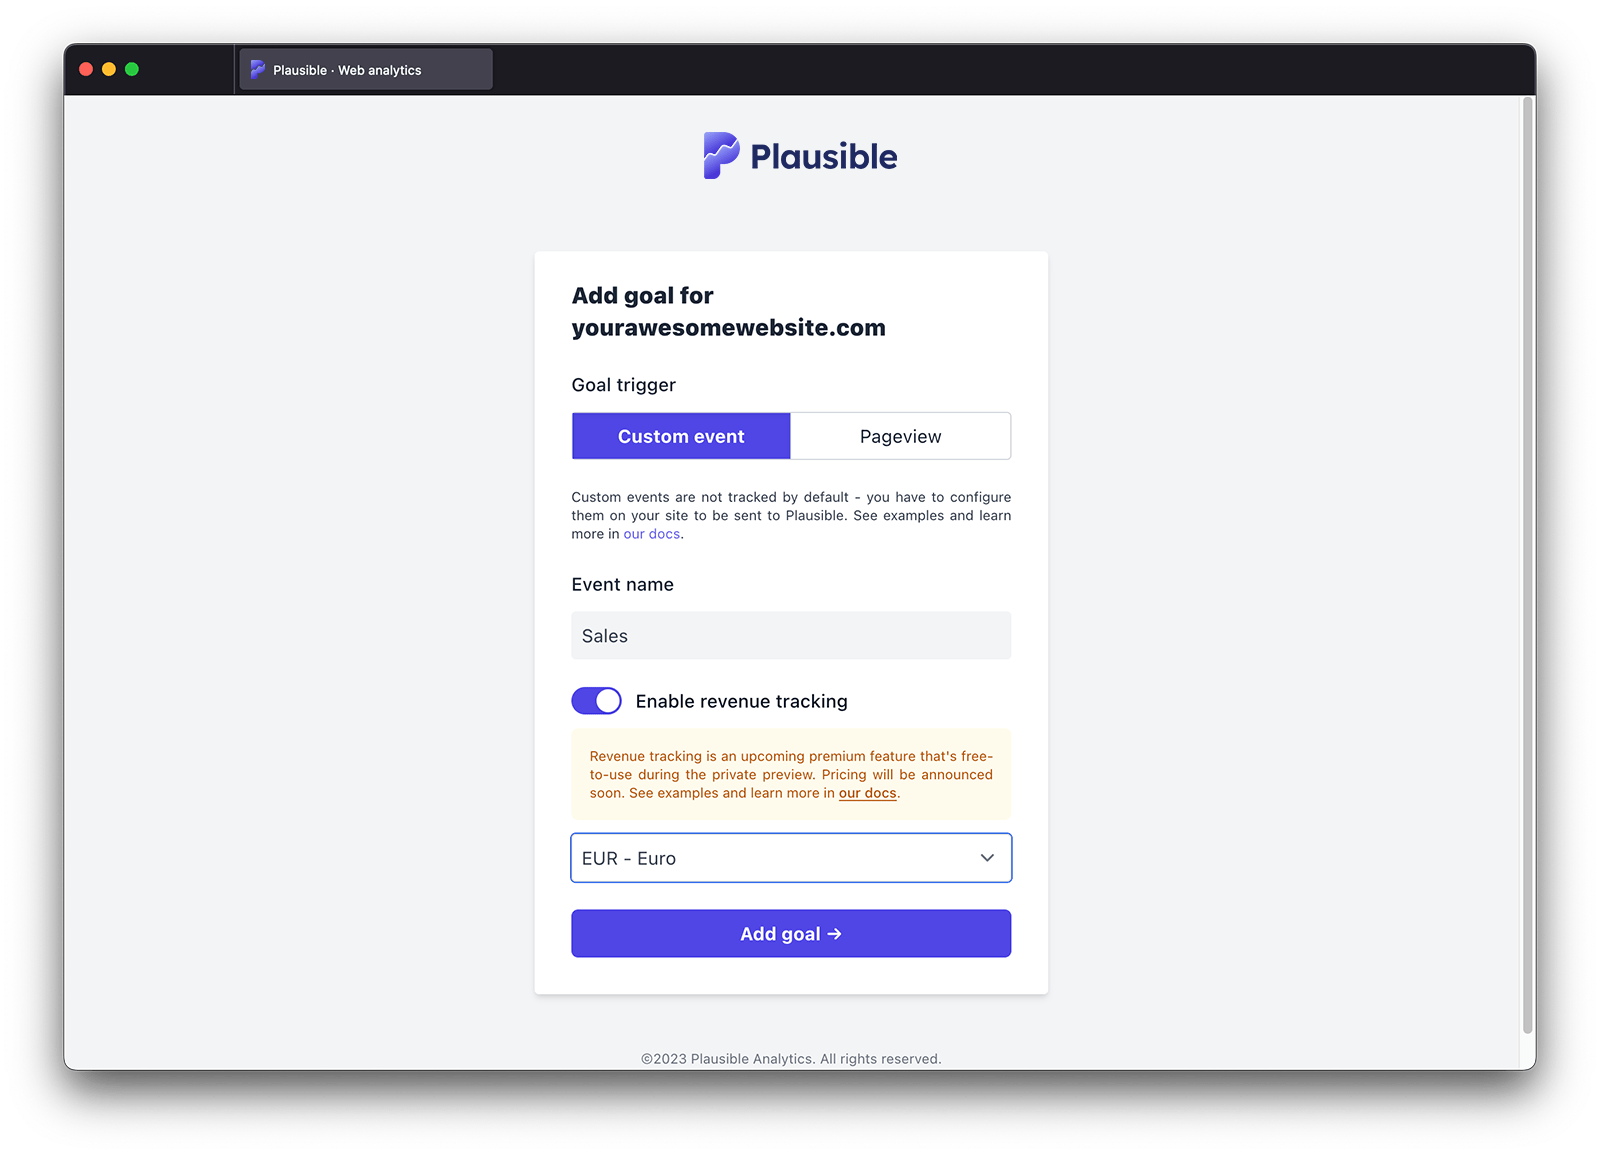
Step 1: Add a new custom event and specify the currency of your choice
Go to your site settings and in the Goals section click on the Add goal button. Choose Custom event as the goal trigger, enter the goal name in the Event name field, switch to Enable Revenue Tracking and set the base currency of your choice. This currency will be used for total and average revenue metrics in the dashboard. Note that the currency for a specific event cannot be changed later.
Step 2: Send the revenue data from your site
You can now start sending revenue data from your site alongside custom events. You can send the revenue data in the currency that the purchase was made in too and we'll convert it to your goal's base currency.
How to send revenue data depends on the way you've set up custom events. You can either use the CSS class name approach:
<button class="plausible-event-name=Purchase plausible-revenue-amount=10.29 plausible-revenue-currency=EUR"></button>
Or the JavaScript function approach:
window.plausible("goal name", {revenue: {currency: "USD", amount: 10.29}})
Or using the Events API directly.
Custom events and revenue goals are listed at the bottom of your dashboard and will appear as soon as the first conversion has been tracked.
This lets you track product names, coupon codes, if customers are logged in and more. Learn more.
Revenue tracking strategies
One purchase event vs. per-product events
The simplest approach is a single Purchase event with the total order value. This gives you clean revenue totals, referral attribution and conversion rates without complex setup.
If you need to break down revenue by product type, category or subscription tier, use custom properties alongside the revenue event. For example:
plausible('Purchase', {revenue: {currency: 'USD', amount: 49.00}, props: {plan: 'Pro'}})
This lets you filter the revenue report by plan to compare revenue from different product lines.
Where to fire the event
Fire the revenue event on your order confirmation or thank you page, not on the checkout button click. Firing on button click captures intent but not completed purchases, which inflates revenue figures and makes attribution misleading.
For subscription upgrades, fire on the confirmation page after payment is processed, not when the user selects a plan.
Integrating with WooCommerce
If you're running WooCommerce, you can use our WordPress plugin. It has built-in support for tracking of WooCommerce store activity including:
- Tracking of several custom events including actions such as add to cart, complete purchase and revenue
- Tracking of several custom properties including product name and product category
- A purchase funnel tracking drop-off from viewing a product to completing a purchase
All this is done automatically for you by our plugin and you don't need to manually set up any custom events nor make any changes to the code of your store. Check here to learn more about WooCommerce site tracking with Plausible.
Integrating with Shopify
If you're using Shopify, you can track sales and revenue by making a few changes to the order status page. See our complete Shopify guide here.
Integrating with Magento
There's a third-party Plausible plugin for Magento that supports custom events and revenue goals tracking. Take a look.
Troubleshooting revenue tracking
Revenue not showing in the dashboard
- Check that the goal name in your Plausible site settings matches the event name exactly (case-sensitive)
- Confirm the
revenueobject uses the correct format:{currency: 'USD', amount: 49.00}. The amount must be a number, not a string - Use your browser's Network tab to verify the event is being sent. Look for a request to
plausible.io/api/eventand check the payload includes the revenue data - If you are using a proxy, confirm the proxied endpoint is receiving and forwarding the full event payload
Revenue amount is wrong
- Check that the amount is in the major currency unit (49.00 for $49, not 4900 for cents)
- If you see duplicate revenue, check for multiple Plausible snippets on the page or the event firing more than once on page load
- For multi-currency stores, Plausible records each transaction in the currency you specify. If you mix currencies in the same goal, totals will be summed as if they are the same currency. Use separate goals per currency or convert to a base currency before sending
Currency code format
Use standard ISO 4217 codes: USD, EUR, GBP, SEK and so on. Incorrect codes will cause the event to be recorded without revenue data.
What's next?
- Set up a funnel to measure drop-off from landing page to checkout
- Explore open-ended purchase paths with user journeys to see what visitors do before buying
- Use custom properties to break down revenue by product name, category or coupon code
- Filter and segment your dashboard to see revenue by source, campaign, country or device
- Query revenue data programmatically using the Stats API
- Use the ad cost calculator to calculate your CPC, CPM and CPA by dividing your ad spend by the conversions Plausible records
Learn more about tracking ecommerce revenue attribution on our blog.