Plausible: Privacy-first web analytics plugin for WordPress
Plausible Analytics is a privacy-friendly web analytics plugin for WordPress that is an easy-to-use, lightweight and more accurate alternative to Google Analytics.
- How is Plausible Analytics different from Google Analytics?
- How can Plausible Analytics be used for WordPress?
- How to get started with Plausible Analytics?
- How to install Plausible Analytics WordPress plugin?
- Insert your domain name and plugin token
- How to enable a proxy to get more accurate stats
- How to view your stats directly in your WordPress dashboard
- How to exclude specific pages from being tracked
- How to exclude admins and other roles from being tracked
- How to disable menu in toolbar
- Enhanced measurements
- How to track 404 error pages
- How to track file downloads
- How to track external link clicks
- How to track cloaked affiliate link clicks
- How to setup custom events to track goal conversions
- How to send custom properties
- How to track ecommerce revenue
- How to track form completions
- How to enable site search tracking
- How to track logged-in user status
- How to enable hash-based URL tracking
- How to track custom query parameters
- Other things you can do with Plausible
- Enjoying Plausible and our WordPress plugin?
How is Plausible Analytics different from Google Analytics?
Plausible Analytics is built to be a more modern alternative to Google Analytics and other traditional analytics solutions. Here’s what makes us different:
- Plausible, unlike Google Analytics, doesn’t use cookies, doesn’t use any long-term identifiers and doesn’t track any personal data. We’re exclusively powered by EU-owned cloud infrastructure. Read more on what makes Plausible a privacy-first web analytics.
- Plausible, unlike Google Analytics, is built for speed and performance. Plausible will not slow down your site.
- Plausible is much more accurate in stats as compared to GA4.
- Plausible, unlike Google Analytics, is simple to use and get valuable insights from. All the key metrics are displayed on one page, including top posts, referral sources, engagement metrics (time on page, scroll depth, bounce rate and more), external link clicks and goal conversions.
- Plausible like WordPress but unlike Google Analytics is open source software. You can inspect and review our source code to verify that our actions match with our words.
- Plausible, unlike Google Analytics, is not a free as in beer product. We don’t sell or monetize your site data. We choose the subscription business model rather than surveillance capitalism and are solely funded by the fees our subscribers pay us.
- There’s a 30-day free trial with no credit card required. If you find Plausible useful, you can get on a paid subscription. The plans start at $9 per month and are based on the number of page views your sites have. You can see the pricing here.
How can Plausible Analytics be used for WordPress?
Plausible is a web analytics plugin that can be used to measure your website traffic, understand trends, analyze traffic sources, marketing campaigns, build funnels, track revenue, and much more. We offer a very easy setup and some special features for WordPress users, an overview is here:
- See which external and affiliate links people actually click so you know what sends traffic and drives value
- Find out which files get downloaded the most, whether they are PDFs, resources, or digital products
- Measure form submissions as conversions to understand how well your pages and campaigns perform
- Define goals and custom events using CSS class names to track meaningful actions and see where conversions come from. No JS knowledge needed.
- View your Plausible stats directly inside WordPress without switching tools or tabs
- Track 404 error pages that people visit so you can fix them and redirect them to more appropriate pages
- Track post authors, categories and custom taxonomies
- Track logged in vs logged out traffic to see how members and public users differ
- Send custom properties (extra context) alongside pageviews or custom events to better segment and analyze your traffic
- Track purchases and revenue for your ecommerce store
- Get built-in tracking for WooCommerce and Easy Digital Downloads, including add to cart, checkout, and completed purchases
- Track site search terms. See what people search for on your site to understand their intent and content needs
- Exclude specific pages from being tracked when they should not appear in your analytics
- Exclude admins from being tracked. You can exclude editors, authors and contributors from being tracked too. Keep your data clean and accurate
- Control who can access the analytics dashboard by assigning access to specific user roles
- Jump to analytics for any post or page from the WordPress toolbar while browsing your site
How to get started with Plausible Analytics?
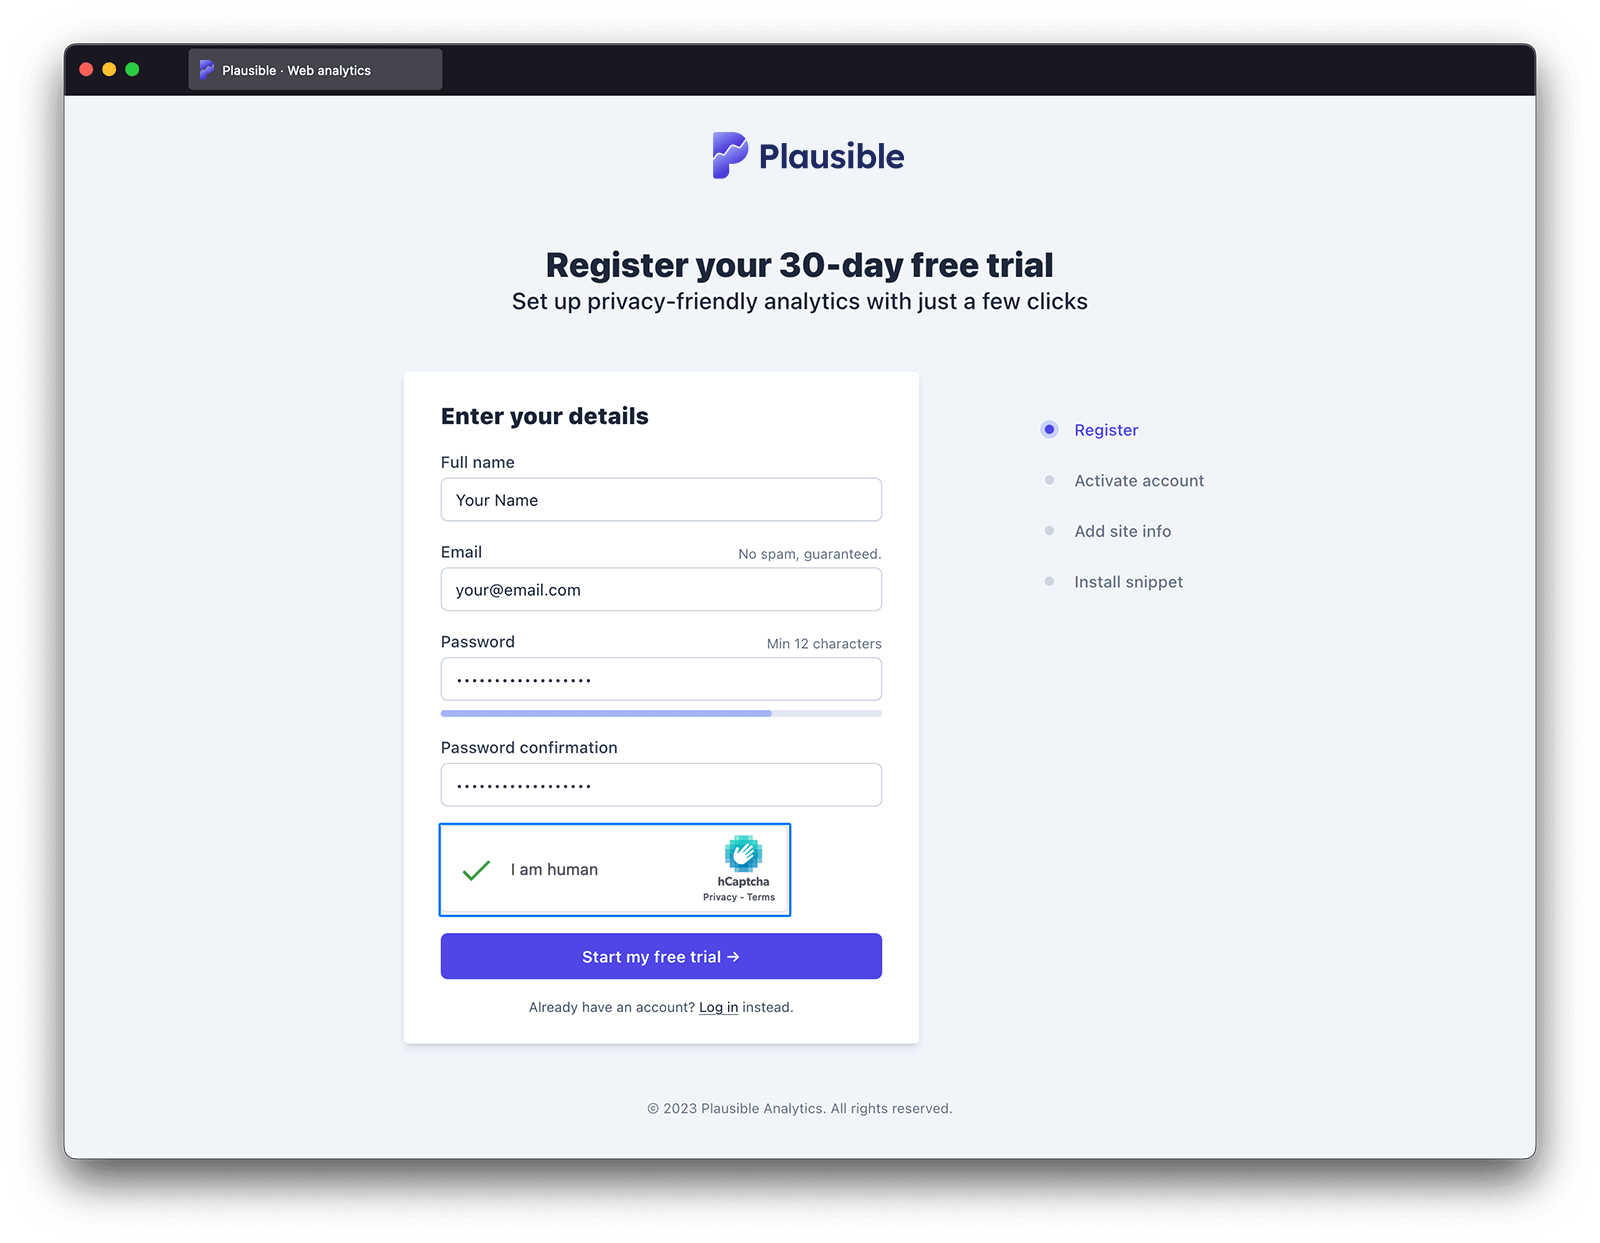
To use Plausible Analytics, you need to register an account. To explore the product, we offer you a free 30-day trial (no credit card required).
Click here to register. It is a simple process and we only ask for your name and email address.
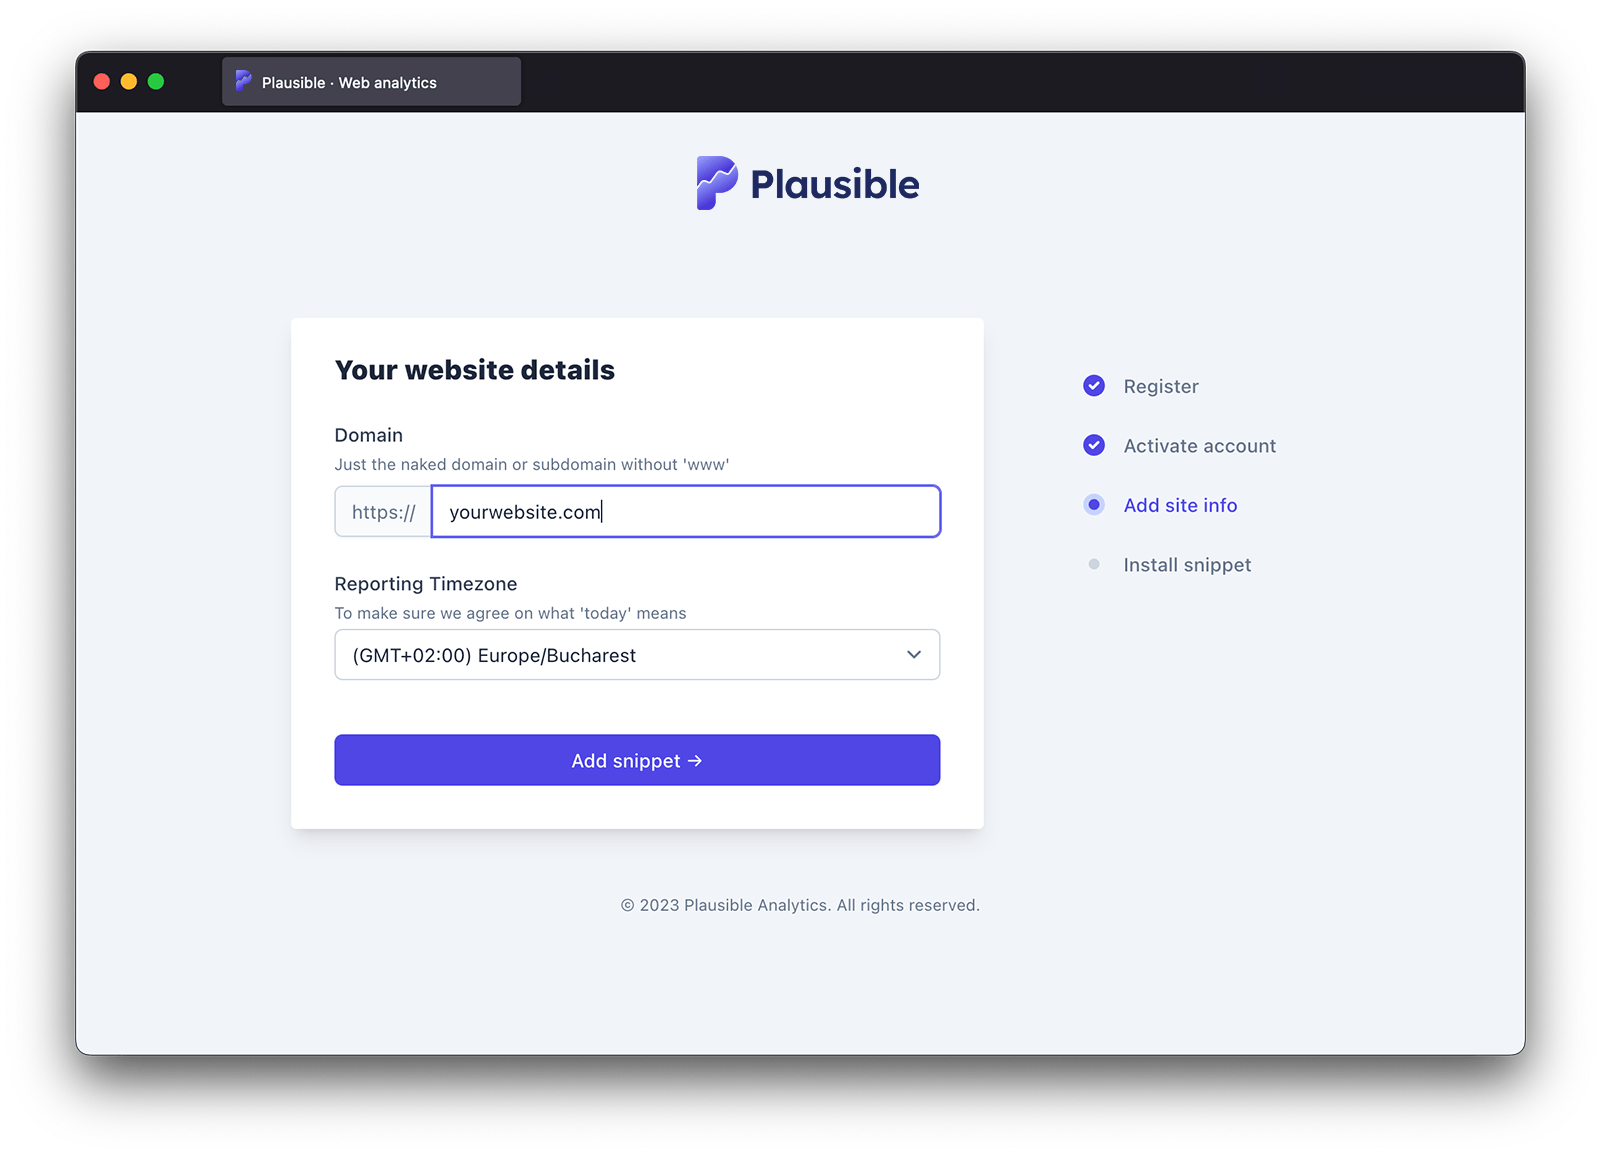
After you verify your email address, you need to enter the domain name of the website you want to track.
Please, remove https and www from the URL, just keep the hostname (yourdomain.com). For example, if your site is https://www.yourdomain.com then the part to enter in the “Domain” field is yourdomain.com.
That’s it! You have now registered for an account and you have added your website.
Now you need to go to your WordPress dashboard and activate the Plausible Analytics WordPress plugin.
How to install Plausible Analytics WordPress plugin?
- Go into the “Plugins” section in the left-hand side navigation within your WordPress dashboard.
- Click the “Add Plugin” button. This will take you to the plugins marketplace.
- In the search box, type “Plausible Analytics” and press Enter/Return. Make sure to open the official plugin listed, as shown in the screenshot below.
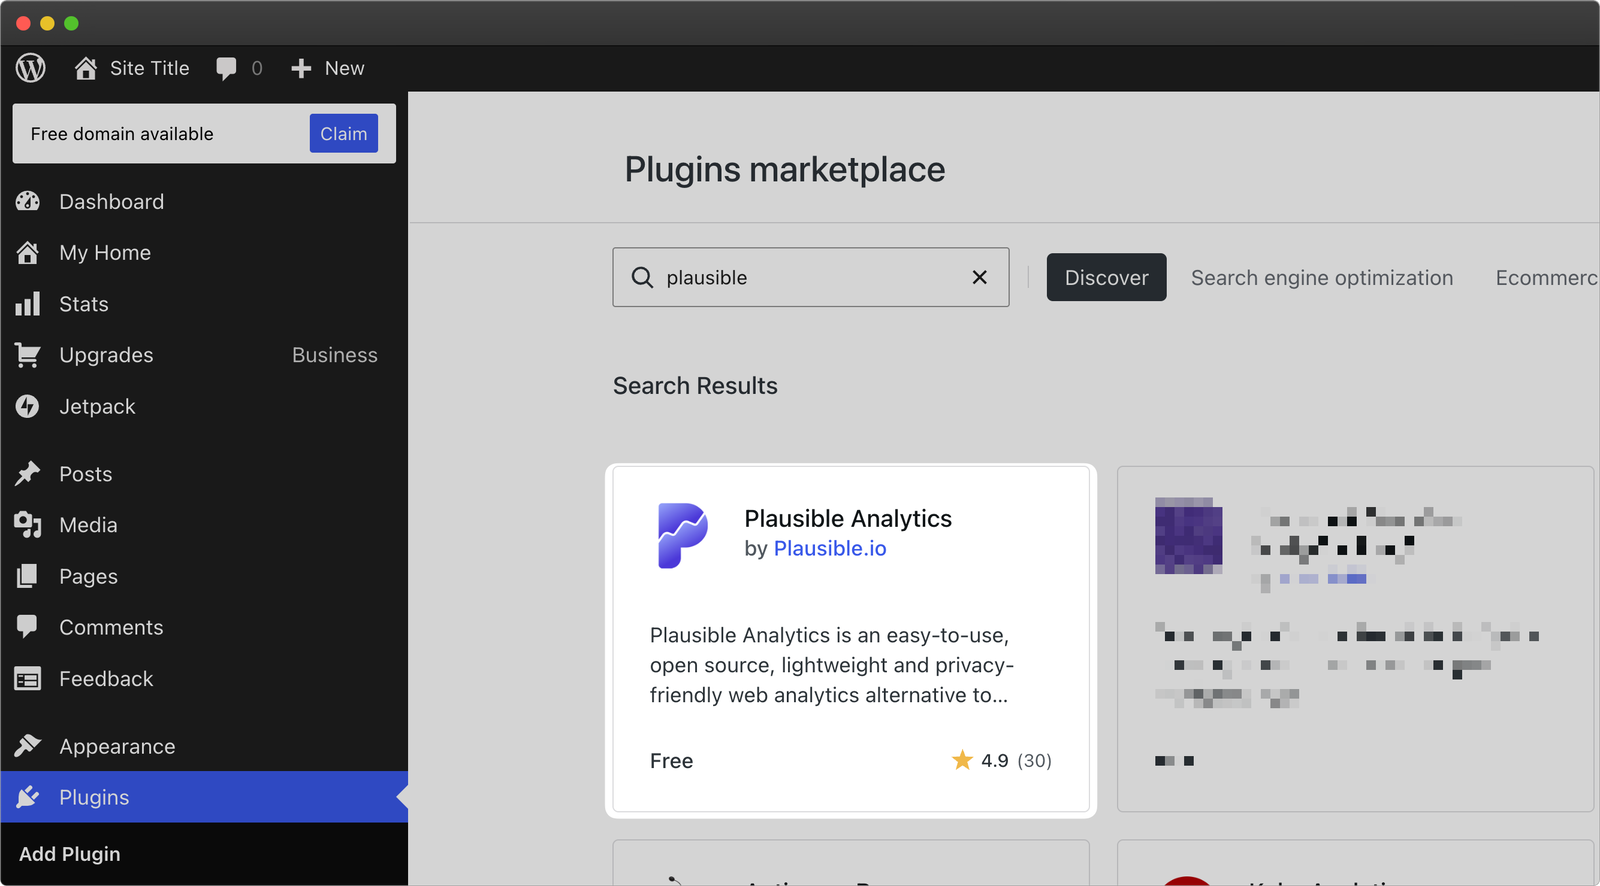
- Install and Activate Plausible. You can also find the listing of our official “Plausible Analytics” plugin.
- You will then be taken through our Get Started guide to set up the plugin and the different options. You will see the same, and many more, options in the Plausible plugin settings screen, which we will explain one.
This is the full settings screen and it comes with a few options pre-enabled which you can keep as it is if you do want to track those things or turn them off.
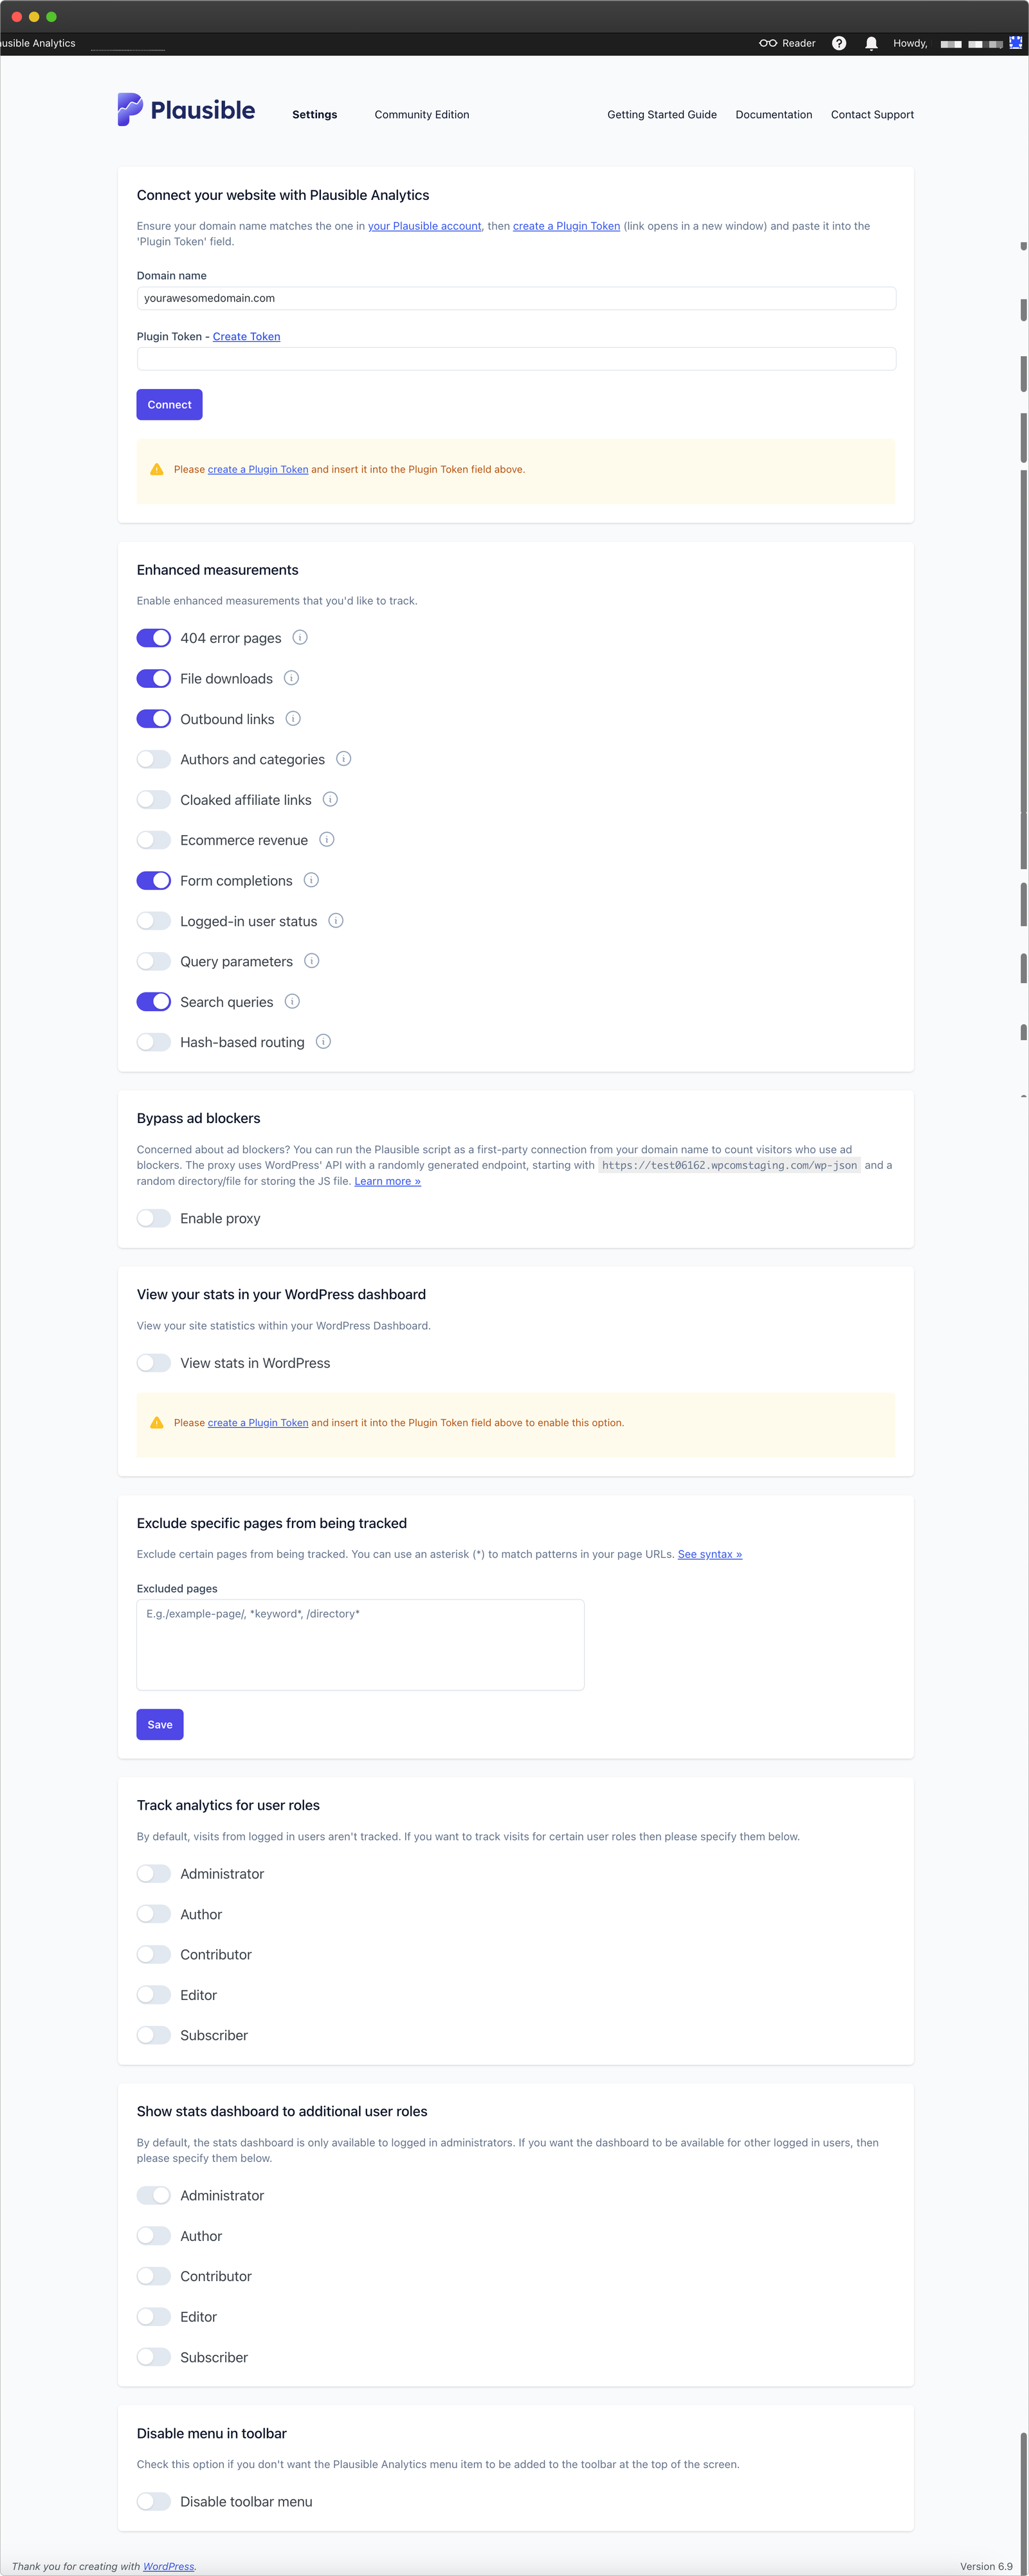
Here are elaborate explanations for all the settings.
Insert your domain name and plugin token
In the “Domain Name” field, make sure you use the domain name exactly as you’ve added it to your Plausible account. Please remove https and www from the domain name, just keep the hostname (yourdomain.com).
To automate the plugin setup, you need to generate a plugin token in your Plausible site settings and paste it into the “Plugin Token” field in the plugin. This will ensure that you can take all the actions directly in the settings area of our WordPress plugin without needing to visit your Plausible site settings.
You’ll find a link to generate the token directly within the plugin settings. Clicking on this link will take you to the plausible.io website where you should click on the “Create Plugin Token” button. Then copy the token that is presented to you.
Next, go back to the Plausible WordPress plugin settings, paste the token into the “Plugin Token” field and click the “Connect” button.
Oops! The token you used is invalid
Are you seeing the “Oops! The Plugin Token you used is invalid” error after trying to connect your plugin token?
Here are the most common reasons for that error:
- Double-check that you’re pasting the plugin token and not another key. Plugin tokens always look like this:
plausible-plugin-xxxxxxxxxxxx - Ensure the plugin token was created for the exact site you’re trying to connect. Plugin tokens are site-specific
- If everything looks correct, try creating a new plugin token and connect it again
That’s it! You are now counting your site stats with a privacy-first web analytics tool. You can now go to our website and access your Plausible Analytics account to view the dashboard.
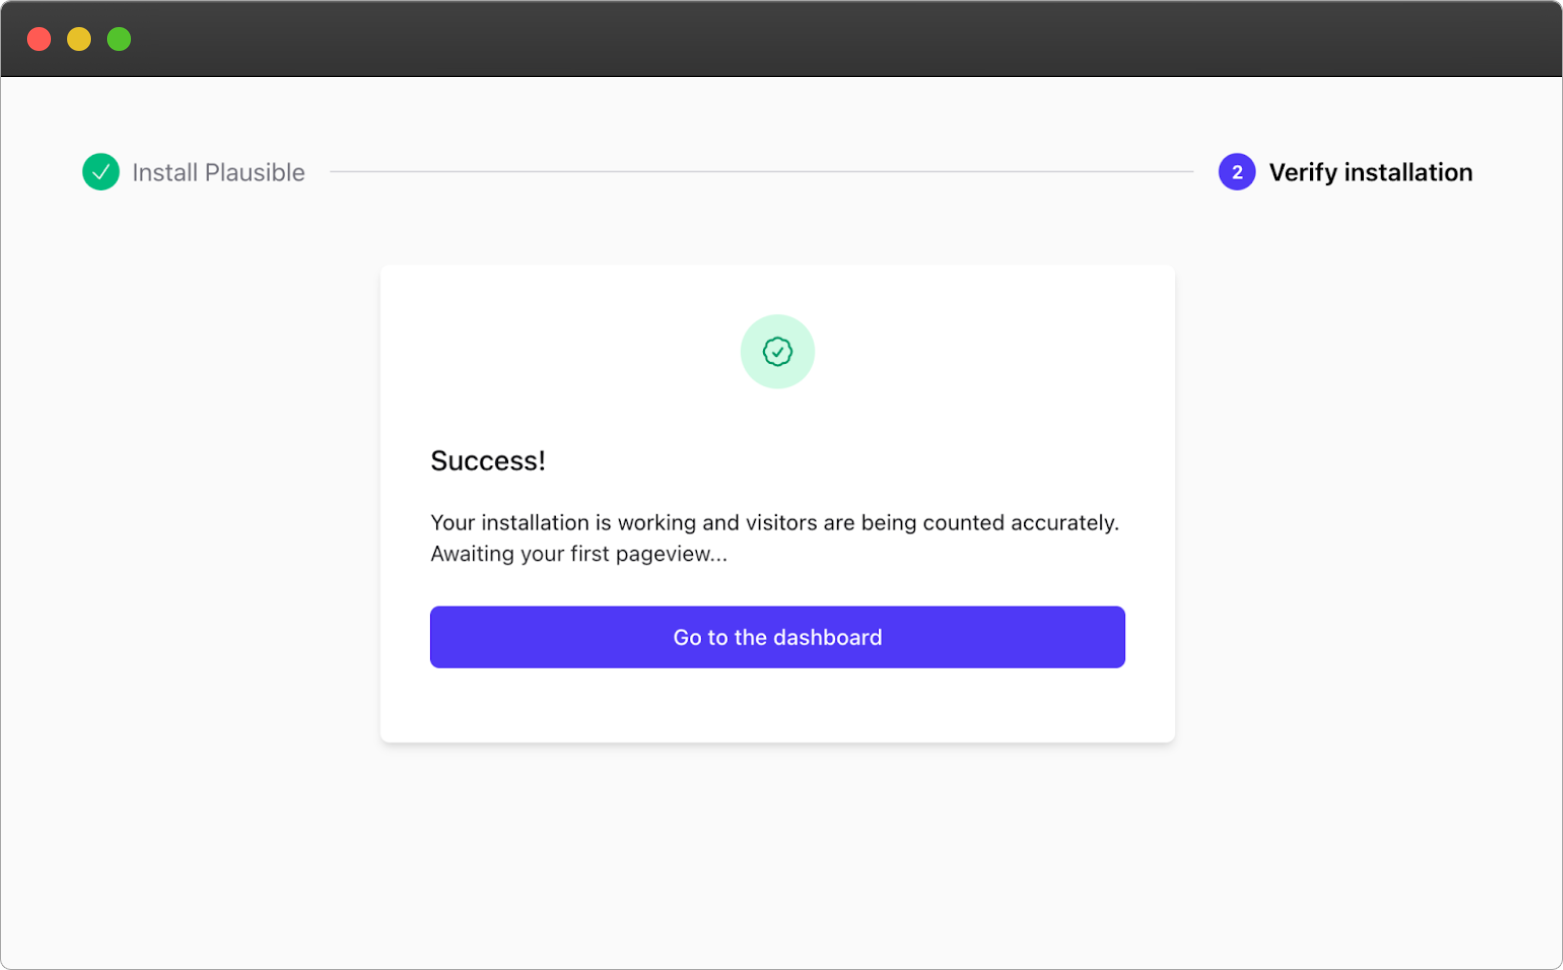
You can also verify your installation to make sure everything is on track. You can launch our testing tool at any time from your site settings. You will see a message like this if your tracking is working fine.
How to enable a proxy to get more accurate stats
Plausible script is not blocked to the same extent as Google Analytics but we’re blocked by some blocklist maintainers who have taken the stance that they want to block every tracking script and don’t want to have the responsibility to judge what’s good and what’s bad.
Site owners feel unfairly targeted and an innocent casualty of this arms race between blocklist maintainers and the adtech industry. Site owners want some data to figure out what’s going on and learn what they can do to improve. It’s unfortunate for them to lose valuable, privacy-friendly insights that help them create a better user experience.
We’ve introduced a proxy feature after hearing from so many site owners who expect privacy-first analytics not to be blocked. We wanted to give a choice to people that use Plausible Analytics.
- Not concerned about missing data? Simply run our default script. A portion of your visitors will block it but otherwise it works all fine. In our testing, between 6% and 26% of people block scripts all depending on the type of the site and the audience. In more extreme cases, with very tech-savvy referral sources these numbers can get up to 60%.
- Are you concerned about missing data? Proxy our script. We’ve made it easy to do so in our WordPress plugin.
- In the “Bypass adblockers” section of our WordPress plugin settings, turn on the “Enable proxy” option.
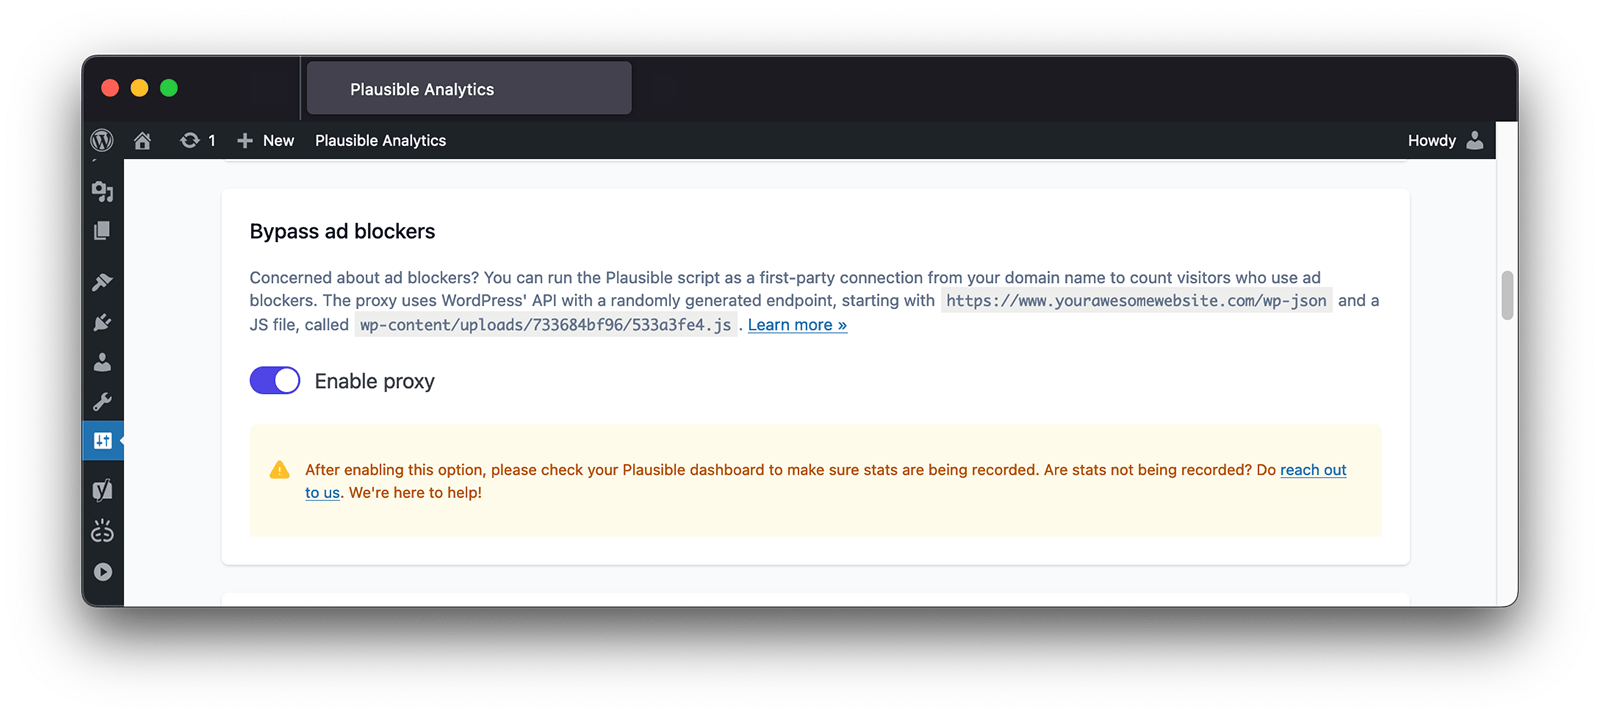
- If you have a caching plugin enabled, please make sure to clear the cache for the changes to take effect.
- Enabling the proxy will make our script run as a first-party connection from your domain name. The proxy uses WordPress’ API with a randomly generated endpoint, starting with
yourdomain.com/wp-jsonand it creates a randomly named folder and file in the/wp-content/uploads/directory.
Stats not being recorded after enabling the proxy?
We’ve put a lot of effort to ensure that the proxy works smoothly and have taken measures to prevent conflicts with popular performance optimization and caching plugins. However, sometimes things might not go as planned.
Many problems with proxy activation are due to restrictive firewall or security settings, where PHP may not be allowed to fetch and copy external resources to the server.
In case plugin conflicts arise with your WordPress, it might cause the stats not to be recorded properly. So please give your integration a quick double-check after you enable the proxy to make sure the stats are being recorded.
Some of the common issues that prevent the proxy from being setup correctly are:
- Browser console errors: After enabling the proxy, visit your website and check the browser console for any error messages related to the proxied script. See more here.
- SSL Certificate Usage: If your site uses an SSL certificate, please go into your WordPress general settings and make sure to add the
sin thehttps://both in theWordPress Address (URL)andSite Address (URL)fields. Then please do try to enable the proxy again. - Firewall or Security Settings: Do you or your hosting company have any firewall or other security plugins activated that may affect the ability for WordPress to create files? Please do disable these or do put your proxy file path and directory in the allow list. Then please do try to enable the proxy again.
- Caching: Do you have any caching enabled either within your WordPress admin dashboard, within your hosting company or Cloudflare? Please try to clear all caches and then try to enable the proxy again.
- File Permissions: Do you have correct permissions for WordPress to be able to create files in the uploads directory? The folder permissions (755) for the
/wp-content/uploads/directory and file permission (644) are needed. - PHP error logs: Do check your PHP error logs after trying to enable the proxy. You may find helpful messages there to guide further troubleshooting.
After making any changes, remember to disable the proxy and clear all caches. Then, try enabling the proxy again and clear all caches once more.
If the proxy script is slow
We will send you a notification if the proxy takes too long (>500ms) to send pageviews. This probably means the speed module failed to install automatically. To resolve this:
- Access your server using (S)FTP, SSH or your host
- Navigate to the directory of the Plausible plugin, usually
wp-content/plugins/plausible-analytics - Open the
mu-plugindirectory within the plugin directory and copy theplausible-proxy-speed-module.phpfile to thewp-content/mu-pluginsfolder (if themu-pluginsfolder doesn’t exist withinwp-content, create it before copying the file)
How to view your stats directly in your WordPress dashboard
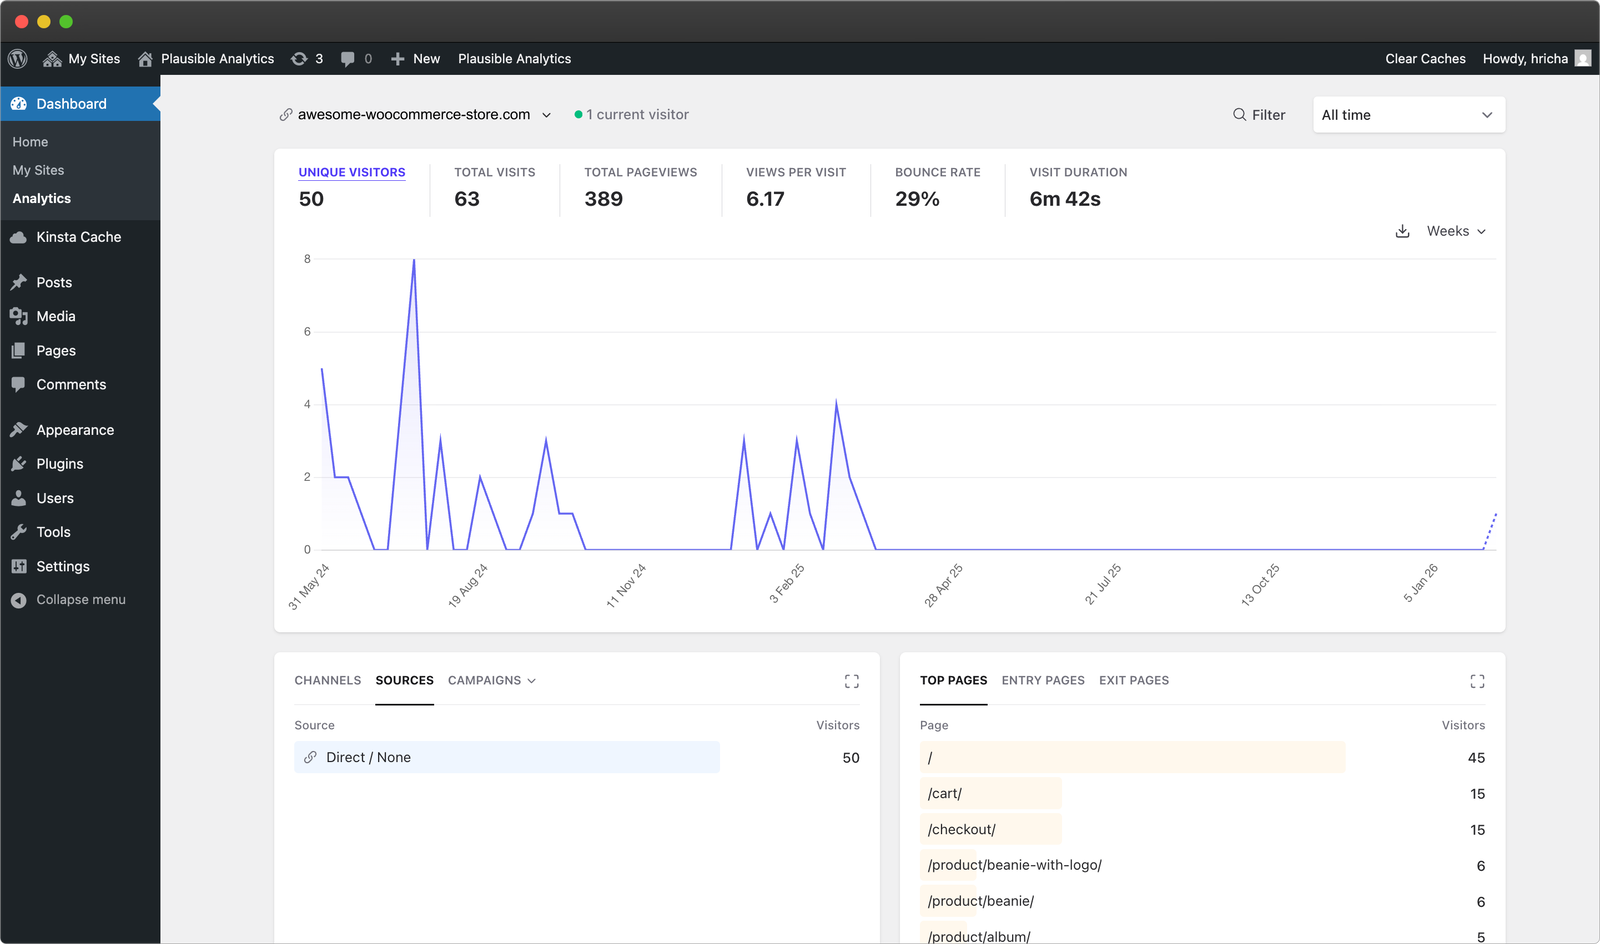
You can view your Plausible stats dashboard directly in your WordPress dashboard without needing to visit our website.
In the “View your stats in your WordPress dashboard” section of the plugin settings, enable the “View stats in WordPress” option.
You can now go to the “Dashboard” section in the left hand side of your WordPress admin navigation menu. Then click on “Analytics” to view your site statistics within your WordPress dashboard.
The site statistics within your WordPress dashboard are available to the administrators by default. In the “Show stats dashboard to additional user roles” section of our WordPress plugin, you can also grant access to the stats dashboard to editors, authors and contributors.
How to exclude specific pages from being tracked
In the “Exclude specific pages from being tracked” section of our WordPress plugin settings, you can add a list of page paths that you don’t want to be counted in your website analytics.
Any pages you list should be comma-separated. All entries must begin with a /, and should not include the trailing slash as we account for this automatically.
You can use an asterisk (*) to match patterns in your page path URLs. Asterisks can be placed on either end or in the middle of any page path URL. You can for instance exclude all of your articles within a specific directory by setting this pageview goal /subdirectory-to-exclude*.
How to exclude admins and other roles from being tracked
By default, our WordPress plugin excludes your own “administrator” visits from being counted in the stats. You can optionally choose to exclude visits from being counted for other user roles too including authors, editors and contributors. Go to the “Track analytics for user roles” section of our WordPress plugin to do so.
If you’d like to count your visits, you can do so as well. Simply enable the user role that you prefer to track.
How to disable menu in toolbar
By default, Plausible adds a shortcut to the WordPress toolbar so you can quickly jump to analytics for the page you’re viewing. If you prefer a cleaner toolbar or don’t need quick access to stats while browsing your site, you can disable this menu with a single toggle.
Enhanced measurements
How to track 404 error pages
Having 404 error pages on your WordPress site can lead to a bad user experience, a negative first impression, and even damage your search engine rankings and traffic you get from Google.
Plausible Analytics plugin can help you identify those broken links and 404 page not found errors.
In the “Enhanced measurements” section of our WordPress plugin settings, enable the “404 error pages” option.
All the 404 error pages will start being tracked and will be displayed in the “Goal Conversions” report of your Plausible Analytics dashboard.
You’ll see “404” goal as soon as the first visit on an error page has been tracked. You’ll see a property (properties explained below) “path” to show the 404 pages.
![]()
The other property is also visible here for “user_logged_in” because if you enable this setting (explained below), this property is available within all the relevant filters too.
You will be able to see the traffic sources to these 404 pages, which pages are throwing a 404, what were the entry pages and exit pages for such sessions, whether they are isolated to specific browsers, which locations, etc.
How to track file downloads
File downloads tracking is essential for many site owners and Plausible helps you automate this process. Our file downloads tracking captures a file download event each time a link is clicked with a document, presentation, text file, compressed file, video, audio or other common file type.
Both internal and external files downloads are tracked. These file extensions are tracked:
.pdf, .xlsx, .docx, .txt, .rtf, .csv, .exe, .key, .pps, .ppt, .pptx, .7z, .pkg, .rar, .gz, .zip, .avi, .mov, .mp4, .mpeg, .wmv, .midi, .mp3, .wav, .wma, .dmg
In the “Enhanced measurements” section of our WordPress plugin settings, enable the “File downloads” option.
All the file downloads will start being tracked and will be displayed in the “Goal Conversions” report of your Plausible Analytics dashboard.
You’ll see “File Download” goal as soon as the first link that leads to a file has been recorded along with details on the files that were downloaded, on which pages, conversion rate, and other relevant properties if sending.
How to track external link clicks
In the “Enhanced measurements” section of our WordPress plugin settings, enable the “Outbound links” option.
All the external link clicks will start being tracked and will be displayed in the “Goal Conversions” report of your Plausible Analytics dashboard.
You’ll see “Outbound Link: Click” goal as soon as the first external link click has been tracked.
How to track cloaked affiliate link clicks
Plausible Analytics plugin can help you automate cloaked affiliate link click tracking on your WordPress site.
In the “Enhanced measurements” section of our WordPress plugin settings, enable the “Cloaked affiliate links” option.
Then enter the partial URLs (also known as shortlink slugs) that you’d like to track. E.g. enter /recommends/ if you want to track clicks on cloaked links such as https://yourdomain.com/recommends/affiliate-product/ or https://yourdomain.com/recommends/another-product/.
All the cloaked affiliate link clicks will start being tracked and will be displayed in the “Goal Conversions” report of your Plausible Analytics dashboard.
Once the first cloaked affiliate link is clicked, a new goal called “Cloaked Link: Click” will appear in the “Goal Conversions” report of your Plausible Analytics dashboard.
Clicking on this goal shows you which cloaked links were clicked, along with the number of unique and total clicks for each. You can also look at the “Top Pages” report to see which pages those cloaked links were clicked on.
How to setup custom events to track goal conversions
Plausible Analytics plugin makes it easy to set up custom events and track actions such as signups or button clicks.
You need to tag the site elements you want to track. No JavaScript knowledge is required to do this. The only thing you need is to tag the site element you want to track with a CSS class name directly in your WordPress editor. Here’s how:
- You can click on any block element you want to track. This will open up the block menu on the right-hand side of your screen.

- You can then click on “Advanced” and add a CSS class name in the “Additional CSS class(es)” field. Add the CSS class name in this format:
plausible-event-name=MyEventName. For instance, if you want to track signup button clicks, you could use:plausible-event-name=Signup+Submit.
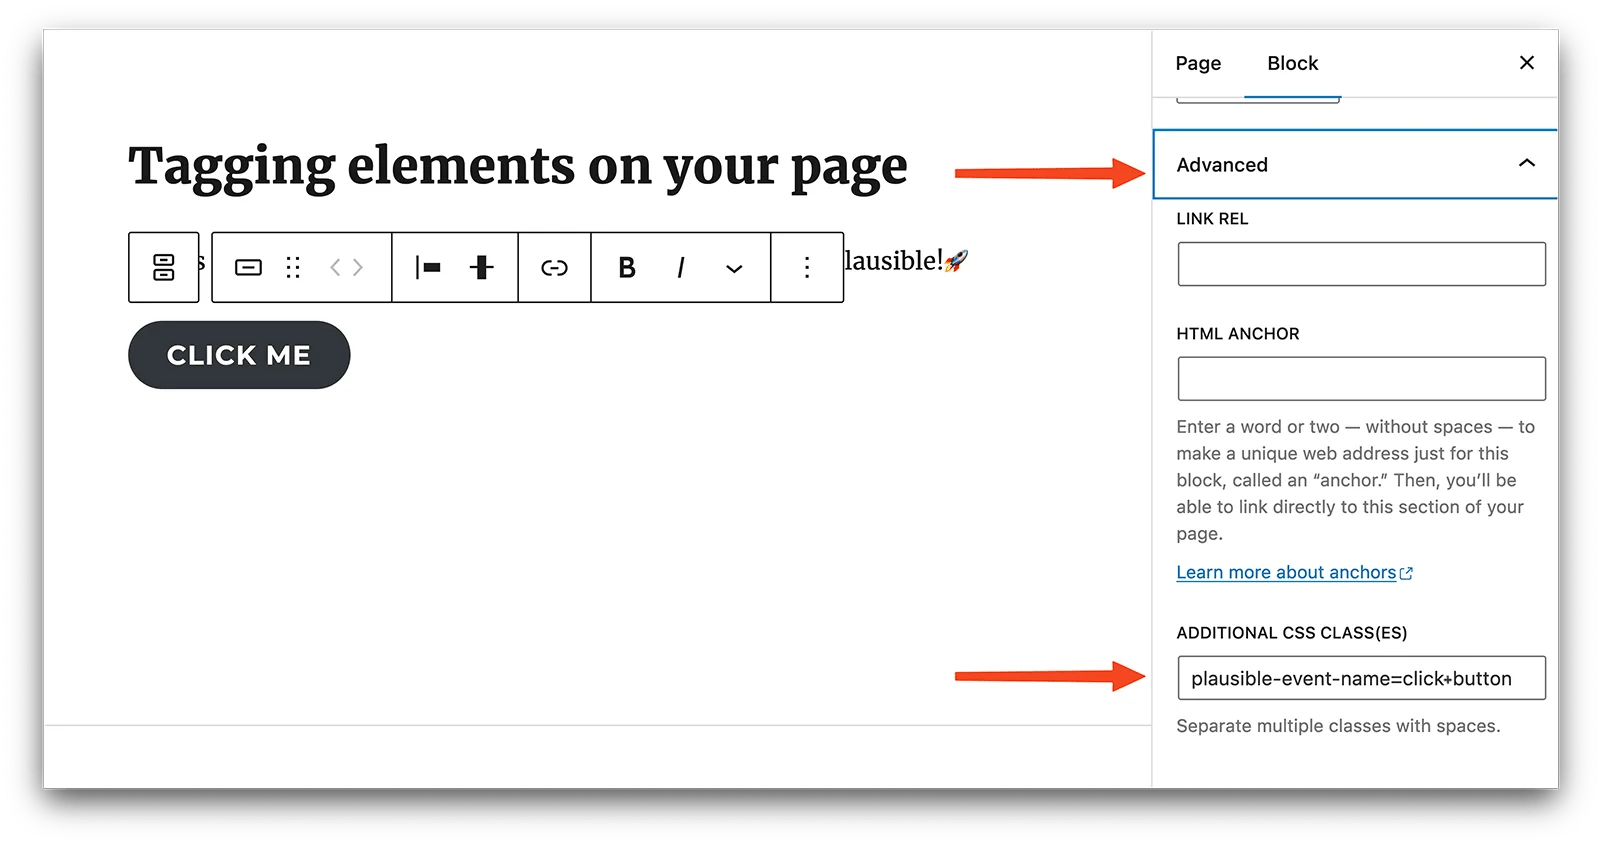
Custom events won’t show up automatically in your Plausible dashboard. You’ll have to configure the goal for them to show up. Here’s how:
- To configure a goal, go to your website’s settings in your Plausible Analytics account and visit the “Goals” section.
- You should see a prompt to add a goal. Click on the “+ Add goal” button to go to the goal creation form.
- Select Custom event as the goal trigger and enter the name of the custom event you are triggering. The name must match the one you added as a CSS class name on your site for conversions to appear in your analytics dashboard.
- In our example where you added a CSS class name
plausible-event-name=Signup+Submit, the goal to add to your Plausible account isSignup Submit(plus is replaced by a space). - Next, click on the “Add goal” button and you’ll be taken back to the Goals page.
When you navigate back to your Plausible dashboard, you should see the number of visitors who triggered the custom event. Custom events are listed at the bottom of your dashboard in the “Goal Conversions” section. Your custom event will appear there as soon as the first conversion has been recorded.
For more details on custom events, please check out this documentation page.
How to send custom properties
You can attach custom properties when sending pageviews or custom events to create custom metrics. Custom properties allow you to collect and analyze metrics that we don’t track automatically.
In the “Enhanced measurements” section of our WordPress plugin settings, when you enable the “Authors and categories” or “Logged-in user status” option, you start seeing properties for them in your dashboard.
This will then start sending your post author names, post categories and custom taxonomies as custom properties alongside pageviews. You can then filter your Plausible dashboard by a specific author to see all the relevant stats for the posts published by that particular writer or a specific category to see the popularity of a category.
Authors, categories and custom taxonomies work out of the box as soon as they’re enabled, but if you prefer you can manually send additional custom properties alongside custom events or pageviews. Here’s how to do so:
Custom properties for custom events
Let’s say you have a button both in the header and footer of your site.
In addition to tracking button clicks, you might want to know which section of your site the button was clicked on. Instead of creating separate goals for each button, you can send a custom property instead:
plausible-event-<property>=<value> allows you to define custom properties that are sent with your custom event. For example plausible-event-position=footer. The full CSS class name would look like this:
plausible-event-name=Signup+Submit plausible-event-position=footer
You can add as many of these classes as you want. And the names can be anything that you want. Custom properties will show up automatically on your dashboard as long as you’ve added the goal itself. You don’t need to manually add them in your settings.
For more details on custom events and custom properties, please check out this documentation page.
Custom properties for pageviews
Post authors, categories and custom taxonomies are tracked out of the box as soon as the “Authors and categories” option is enabled in the “Enhanced measurements” section of our WordPress plugin settings.
For more details on how to send other custom properties for pageviews, please check out this documentation page.
How to track ecommerce revenue
Plausible Analytics plugin has a built-in support for tracking of WooCommerce store activity and Easy Digital Downloads as well. Revenue attribution helps you determine which marketing campaigns and landing pages result in the most revenue for your business or ecommerce store.
In the “Enhanced measurements” section of our WordPress plugin settings, enable the “Ecommerce revenue” option. This will automatically set up and start tracking several WooCommerce or Easy Digital Downloads custom events:
- Add to Cart
- Remove from Cart
- Start Checkout
- Complete Purchase (including revenue)
- Visit /product*
Several custom properties (also known as custom dimensions in Google Analytics) will start being recorded as well for further analysis:
- product_type
- product_cat
- pa_color
- tax
- cart_total
- cart_total_items
- price
- product_id
- product_name
- quantity
- shipping
- subtotal
- subtotal_tax
- tax_class
- total
- total_tax
- variation_id
A purchase funnel will be created as well looking at the user journey all the way from viewing a product to completing a purchase. This will help you see the drop-off rates between the different steps and understand your cart abandonment rate.
All this is done automatically for you and you don’t need to manually set up any custom events nor make any changes to your code.
If you’re not using WooCommerce or Easy Digital Downloads for your store
You can manually configure the actions you want to track regardless of the technology you use to power your store. Here’s how:
- To configure a goal, go to your website’s settings in your Plausible Analytics account and visit the “Goals” section.
- You should see a prompt to add a goal. Click on the “+ Add goal” button to go to the goal creation form.
- Select “Custom event” as the goal trigger, enter the goal name in the “Event name” field, tick to “Enable Revenue Tracking” and set the currency of your choice.
- This currency will be used for total and average revenue metrics in the dashboard. Note that the currency for a specific event cannot be changed later.
- Next, click on the “Add goal” button and you’ll be taken back to the Goals page.
- You can now start sending revenue data from your site alongside custom events using JavaScript or the CSS class name approach:
plausible-event-name=Purchase plausible-revenue-amount=10.29 plausible-revenue-currency=EUR
![]()
For full details on sending revenue data, take a look.
How to track form completions
Form submissions tracking is essential for many site owners and Plausible helps you automate this process. Our form submissions tracking captures a form completion event upon each successful form submission on your site.
We have verified and tested this tracking with Contact Form 7, WP Forms, Ninja Forms and Elementor Forms but it should work for most other forms plugins as well.
In the “Enhanced measurements” section of our WordPress plugin settings, just enable the “Form completions” option.
All the successful form completions will start being tracked and will be displayed in the “Goal Conversions” report of your Plausible Analytics dashboard.
You’ll see “WP Form Completions” goal as soon as the first successful for submission has been recorded. If you have multiple forms on your site, you can click on the “WP Form Completions” goal to see the breakdown over different pages the forms were submitted from.
How to enable site search tracking
Plausible Analytics plugin can help you understand the activity on your search form and identify the search terms your visitors are searching for. It can also help you know how many results your search results show for the different search terms and on which of your pages people have used the search form.
All this can help you better understand the needs of your audience enabling you to create a better website and more relevant content that answers questions people have.
In the “Enhanced measurements” section of our WordPress plugin settings, enable the “Search queries” option.
All the search activity will start being tracked and will be displayed in the “Goal Conversions” report of your Plausible Analytics dashboard.
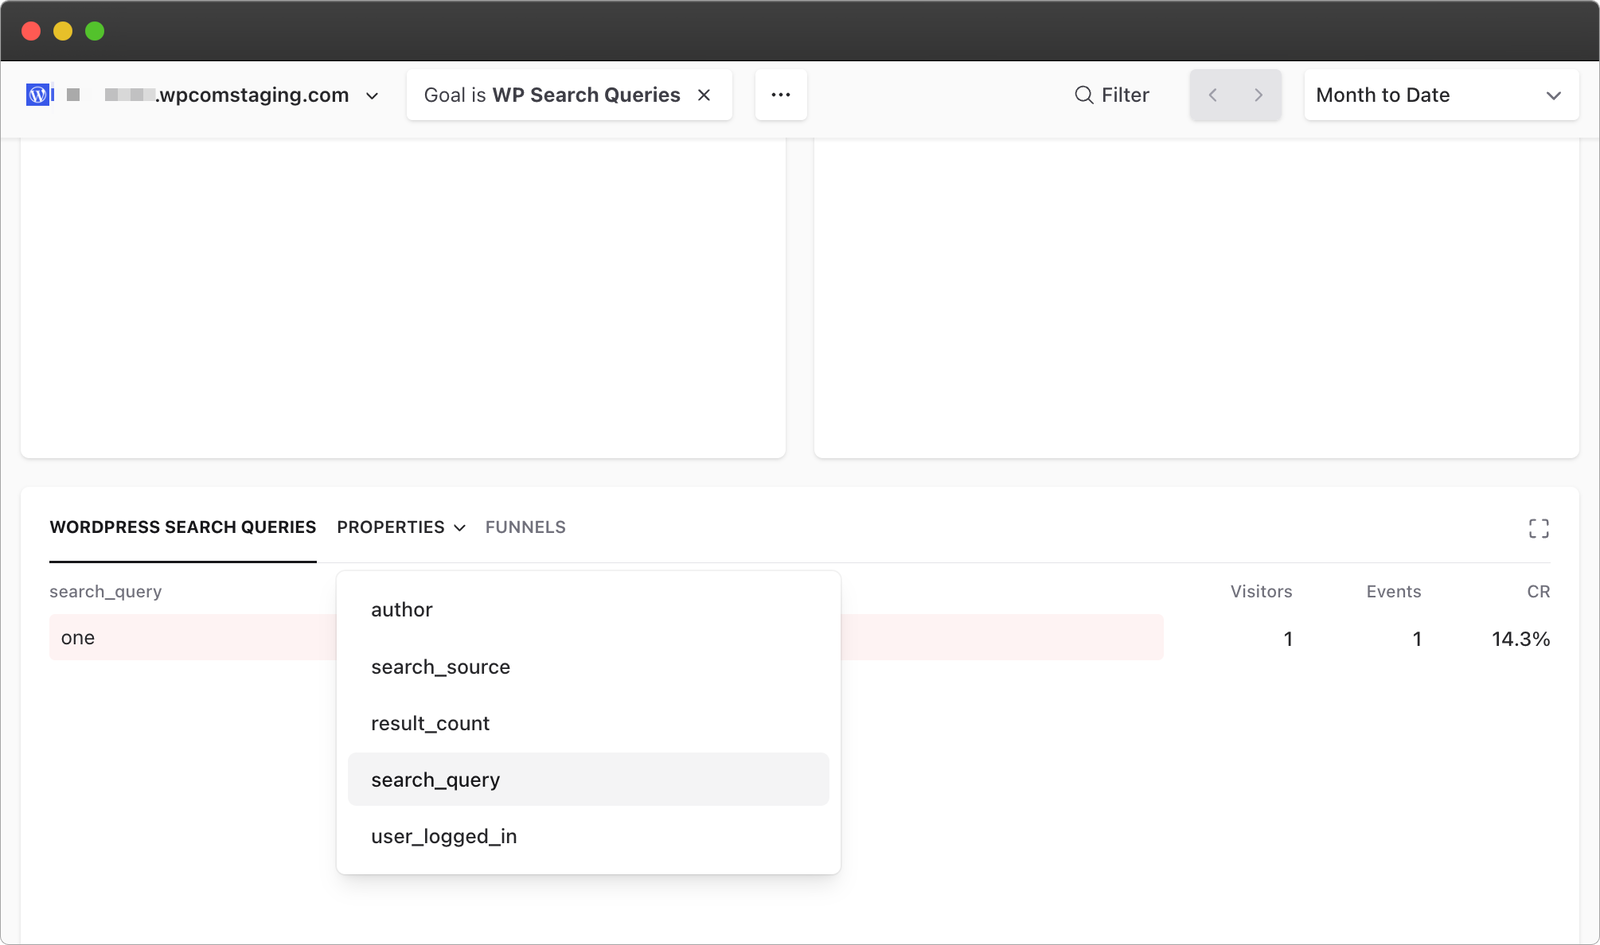
You’ll see the “WP Search Queries” goal appear as soon as the first search is recorded. Click on this goal to segment your audience by visitors who have used your search functionality. Under the “Properties” tab, you’ll find detailed breakdowns:
- search_query: the specific terms people searched for
- result_count: how many results each search returned
- search_source: which pages people searched from
More about site search tracking in WordPress here.
How to track logged-in user status
Plausible Analytics plugin can help you understand the status of your logged in or your logged out users.
In the “Enhanced measurements” section of our WordPress plugin settings, enable the “Logged-in user status” option.
All the user status will start being tracked and will be displayed in the “Goal Conversions” report of your Plausible Analytics dashboard.
In the “Properties” tab of the “Goal Conversions” report, you’ll see the “user_logged_in” property as soon as the first visitor has been recorded. This property will be available in the dashboard with all the relevant filters as well, as shown in the examples above.
How to enable hash-based URL tracking
Does your site contain hash-based URLs such as yourdomain.com/blog-post#specific-subheading or yourdomain.com/#contact?
Normally the hash part of the URL is discarded in your Plausible dashboard. You can enable “Hash-based routing” in your Plausible WordPress plugin settings to preserve the hash-based routing in your stats and see the different pages your visitors have viewed.
In the “Enhanced measurements” section of the Plausible WordPress plugin settings, enable the “Hash-based routing” option to start tracking it. This will be available in your Top Pages report:
![]()
How to track custom query parameters
By default, Plausible strips all query parameters for privacy purposes except for ref, source, utm_source, utm_medium, utm_campaign, utm_content and utm_term.
This means that pages like yoursite.com/article?lang=en will be reported as yoursite.com/article/ in your Plausible dashboard.
In the “Enhanced measurements” section of our WordPress plugin settings, you can enable the “Query parameters” mode to track custom query parameters.
Then enter the query parameter that you’d like to track. E.g. enter lang if you want to track views on pages such as yoursite.com/article?lang=en or yoursite.com/article?lang=de.
All the query parameters will start being tracked and will be displayed in the “Properties” tab of the “Goal Conversions” report of your Plausible Analytics dashboard.
Other things you can do with Plausible
Plausible is a mainstream web analytics tool and you can do everything that a regular Plausible subscriber does. We recommend reviewing our documentation to explore everything you can do with Plausible but here are some quick highlights:
Integrate with Google Search Console
See your search queries, impressions, clicks, and average positions alongside your site traffic. This helps you understand how people find your site through Google and how search performance translates into visits and conversions.
Enable notifications
Set up email or Slack notifications to stay informed about important changes in your traffic. You also get alerts for traffic spikes, drops, so you notice issues or opportunities without constantly checking your dashboard.
Setup funnels
Use funnels to understand how visitors move through key steps on your site, such as landing on a page, viewing product pages, and completing a signup or purchase. Funnels help you spot where people drop off and where you can improve conversions.
Get a consolidated view for all your sites
If you manage multiple websites, you can view combined stats across all of them in a single dashboard. This makes it easier to monitor overall performance, compare trends, and get a high-level overview without switching between sites.
Connect with Looker Studio for custom reporting
Export your Plausible data to Looker Studio to build custom dashboards and reports. This is useful if you want to combine analytics data with other sources or create tailored reports for clients, teams, or stakeholders.
Enjoying Plausible and our WordPress plugin?
Most of our subscribers come from word of mouth, so if you love Plausible, we’d appreciate if you’d consider leaving a comment in the official WordPress plugin directory. Thank you!